The Weakest Link: It’s Not the Element, It’s the Connection
Correct tubular heater installation is vital for preventing premature failure and ensuring electrical safety. The tubular heating element itself is built like a tank—compressed MgO and heavy-gauge alloys. But the connection point? That is the Achilles’ heel. In the field, 9 out of 10 “heater failures” are actually wiring failures: loose nuts causing arcing, or overheated terminals melting the lead wire insulation.
A robust thermal system relies on a positive connection1. This SOP (Standard Operating Procedure) walks you through the precise mechanics of installing, wiring, and protecting Hongtai tubular heaters to ensure they last years, not weeks.
1. Anatomy of the Terminal: Understanding FIG 1 & FIG 2
Before you grab a wrench, look at the terminal structure. As detailed in our manufacturing specs, we utilize a threaded screw terminal assembly2.
The Dielectric Stack-up
You aren’t just bolting a wire to a metal stick. The terminal post is isolated from the metal sheath by a ceramic or mica insulator3.
- Why it matters: This insulator provides the necessary dielectric strength 4 to keep the current flowing into the wire, not arcing to the sheath.
- The Risk: If you crack this ceramic washer during installation, the heater will ground out immediately upon startup.
The “Double Wrench” Technique (Crucial)
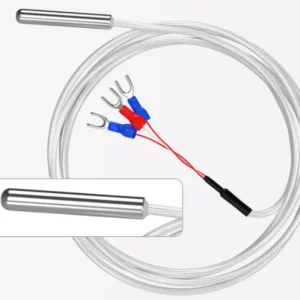
This is where most installers mess up. The internal cold pin is welded to the resistance wire deep inside the tube5.
- The Wrong Way: If you tighten the top nut with a single wrench, the torque transfers down the post, twisting the internal wire. Snap. You just broke the internal weld before even turning the power on.
- The Right Way: Use the Double Wrench Method. Place one backup wrench on the bottom hex nut (closest to the sheath) to hold the post steady. Use a second wrench to tighten the top nut over the wire. Zero torque transfer to the internals.

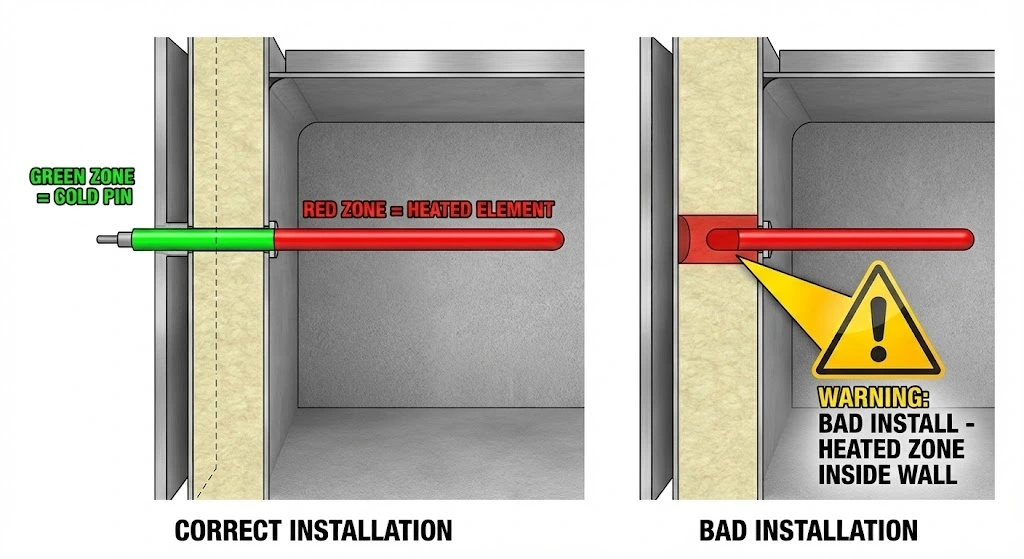
2. Cold Pin Alignment: Don’t Bury the Heat
The “Cold Pin” is the non-heating section of the rod that enters the terminal. Our heaters feature an integral cold pin fusion welded to the helical resistance wire6.
The “Pass-Through” Rule
When installing a heater through an insulated oven wall or tank flange:
- The Hazard: If the active resistance wire (the hot part) ends up sitting inside the thermal insulation, the heat has nowhere to go. It will burn out the element or start a fire in the insulation.
- The Fix: You must calculate the insertion depth so that the entire heated length is inside the chamber. The section passing through the wall and insulation must be the Cold Zone.
- Temperature Check: The junction where the Cold Pin meets the terminal box should ideally stay under 200°C to protect standard lead wire insulation.
3. Field Bending: Do’s and Don’ts
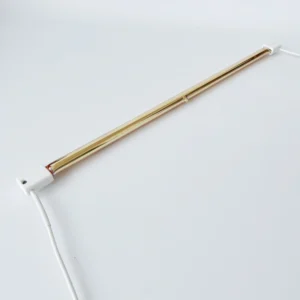
We manufacture straight lengths up to 7000mm7, and often, customers need to bend them on-site to fit specific machinery. While our elements are versatile8, physics still applies.
The Minimum Radius
Don’t fold it like a paperclip.
- Rule of Thumb: The minimum bend radius should be 3x the Sheath Diameter. If you have a 10mm heater, your bend radius should be at least 30mm. Tighter bends crush the internal MgO insulation9, creating a short circuit path.
The “No-Bend” Zone
Never bend the heater at the transition point where the Cold Pin meets the Resistance Wire. This weld point is mechanically rigid. Flexing it will snap the connection. Always leave at least 2-3 inches of straight leg coming out of the terminal before starting your bend.
4. Electrical Safety & Environment
Creepage & Clearance
We build heaters rated for high voltages, up to 550V10. At these potentials, electricity wants to jump (arc).
- Spacing: Ensure your terminal lugs are spaced far enough apart. If using a high-voltage system (480V/550V), verify that the air gap between terminals meets local electrical codes to prevent flashover.
Moisture Management (The MgO Trap)
The high purity magnesium oxide powder 11 inside the tube is like a dry sponge—it loves moisture.
- The Symptom: If a heater sits in a damp warehouse for months, the Megohm reading might drop.
- The Fix: This isn’t a defect. It’s physics. If you see low insulation resistance, bake the heater at 120°C for a few hours to drive the moisture out before full-power operation.
- Seal It: For humid environments, apply a high-temp silicone RTV sealant over the ceramic insulator after wiring.
Step-by-Step: Wiring a Tubular Heater Safely (SOP)
Follow this checklist for every install to ensure safety and longevity.
- Kill the Power: Lockout/Tagout. Verify zero energy.
- Inspect the Threads: Clean any dust or oxidation from the threaded screw terminal12.
- Prepare the Wire: Use high-temperature ring terminals. Do not just wrap bare wire around the post if possible.
- The Sandwich: The wire terminal goes between two washers. Never place the wire terminal directly against the ceramic insulator or the nut.
- Torque it Down: Apply the Double Wrench technique. Tighten until the washer flattens, providing a positive connection13. Do not over-torque.
- Check Clearances: Ensure no stray wire strands are touching the metal sheath.
Frequently Asked Questions (FAQ)
Q: My heater terminals are getting extremely hot and melting the wire. Why?
Hot terminals are rarely caused by the heater itself; they are usually caused by a loose connection. If the nut is not tight enough, it creates electrical resistance. Current flowing through resistance generates heat ($I^2R$). This localized heat melts the wire insulation. Another cause is a “Cold Pin” that is too short, allowing the active heating element to sit too close to the terminal box.
Q: Can I bend a standard tubular heater myself?
Yes, but with caution. You must maintain a minimum bend radius of 3 times the element diameter to avoid crushing the internal magnesium oxide (MgO) insulation. Crucially, never bend the element within the first 3 inches of the terminal end. This is where the internal Cold Pin is welded to the resistance wire; bending here will snap the internal weld.
Q: What is the maximum voltage these terminals can handle?
Correct tubular heater installation is vital for preventing premature failure and ensuring electrical safety. Our standard terminal assemblies are rated for voltages up to 550V, as specified in our electrical ratings14. However, for voltages above 240V, you must ensure proper spacing (creepage distance) between terminals and the ground to prevent arcing, especially in humid environments.