Introduction
In the life of an industrial maintenance technician, few things are as demoralizing as a cartridge heater that has “seized” inside a mold. You pull on the leads, they snap off. You try to drill it out, the bit wanders, and you destroy a $5,000 precision die.
A seized heater is not just bad luck; it is the physics of thermal expansion working against you.
The lifespan of a heater is determined before you even turn the power on. It is determined by the Fit. A proper installation ensures efficient heat transfer and easy removal. A poor installation guarantees overheating and a maintenance nightmare.
This guide is your Shop Floor SOP. We will move beyond the catalog specs to cover the practical realities: the difference between drilling and reaming (H7), the “Goldilocks” rule for Anti-Seize Paste, and three professional techniques for extracting a heater that refuses to leave.
Note: If you are unsure if your previous heater failed due to installation error or voltage overload, compare the damage against our [Cartridge Heater Failure Analysis Gallery]. And [2026 Cartridge Heater Ultimate Guide: From Selection Logic to Failure Analysis]
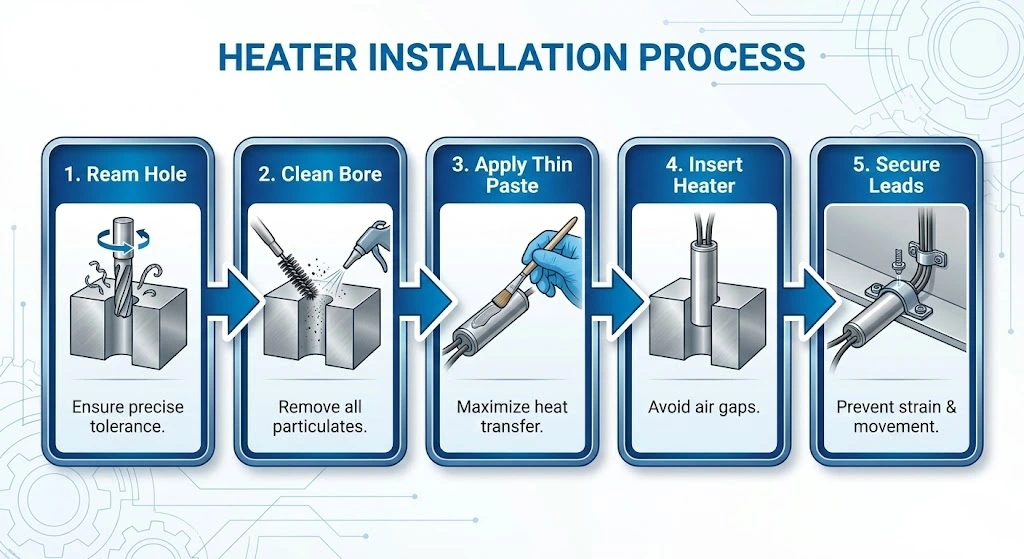
[Visual Element]: A 5-step process flowchart graphic. 1. Ream Hole. 2. Clean Bore. 3. Apply Thin Paste. 4. Insert Heater. 5. Secure Leads.
1. The Perfect Fit: Why Tolerance is Everything
You cannot simply drill a hole and slide a heater in. In the world of high-watt density, Air is the Enemy.
The “Goldilocks” Zone
- Too Loose (> 0.15mm gap): Air acts as a thermal insulator. The heater core cannot shed its energy into the block. It overheats and burns out.
- Too Tight (Press fit): You might hammer it in, but once that metal heats up and expands, it will never come out.
- The Target: We recommend a diametrical clearance of 0.02mm to 0.05mm.
- Example: For a 12.50mm heater, the hole should be 12.52mm – 12.55mm.
Drilling vs. Reaming: The Professional Standard
Stop using standard twist drills for heater holes.
- Drilling: Standard bits “wander” and create a rough, slightly oval hole. A rough surface reduces the contact area between the heater and the metal by up to 50%.
- Reaming (H7 Standard): Always finish the hole with a Reamer. Reaming creates a perfectly round, mirror-smooth cylinder. This maximizes thermal contact and minimizes the friction that leads to seizing.
2. Step-by-Step Installation SOP
Follow this protocol to ensure your heater lasts its full rated life.
Step 1: Degrease and Clean
Machining a mold leaves behind cutting oils and coolants.
- The Risk: If you insert a heater into an oily hole, the oil will carbonize (turn into coke) at high temperatures. Carbon is a glue that cements the heater to the wall.
- Action: Clean the bore thoroughly with a degreaser or solvent before installation.
Step 2: The Anti-Seize Debate (Less is More)
Should you use thermal paste? Yes, but incorrectly applied paste is worse than no paste.
- The Material: Do not use standard CPU grease or silicone. Use a high-temperature Nickel-based or Copper-based Anti-Seize Compound rated for > 800°C.
- The Technique: Apply a paper-thin film.
- Too much paste: It acts as a hydraulic barrier and an insulator, actually blocking heat transfer.
- Correct amount: Just enough to dirty the metal surface.
Step 3: Positioning the Cold Zone
Every heater has a “Cold Zone” at the lead end.
- The Rule: The Cold Zone must be flush with or slightly inside the metal block.
- The Hazard: If the active heated section sticks out into the air, it will glow red and burn out (Dry Firing). Conversely, if the lead connection is buried deep inside the hot block, the lead insulation will melt.
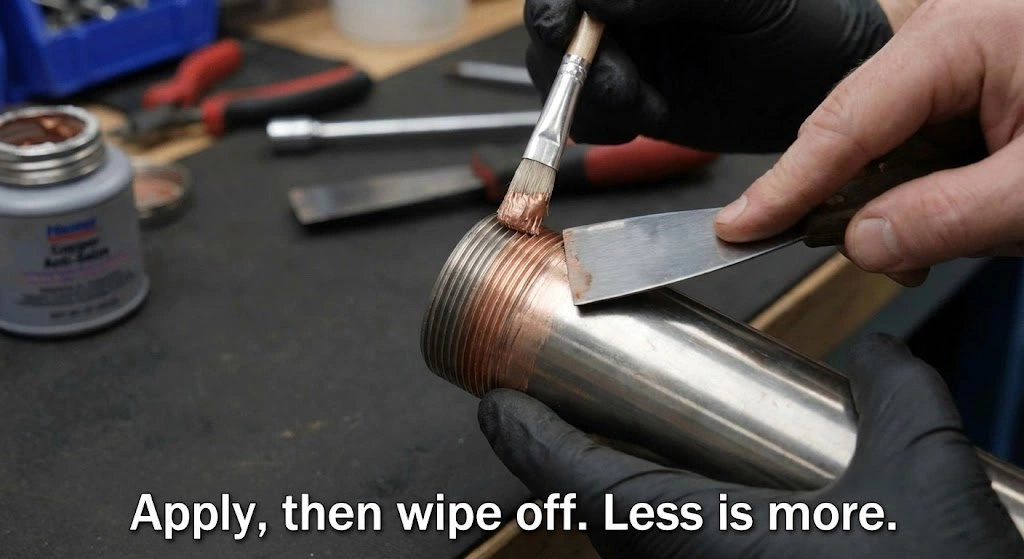
[Visual Element]: A technician applying a dab of copper anti-seize paste to a heater and using a scraper to remove almost all of it, leaving only a faint residue. Caption: “Apply, then wipe off. Less is more.”
3. The Nightmare Scenario: How to Remove a Stuck Heater
So, you didn’t follow the steps above, and now the heater is fused to the mold. Here is the escalation protocol for removal.
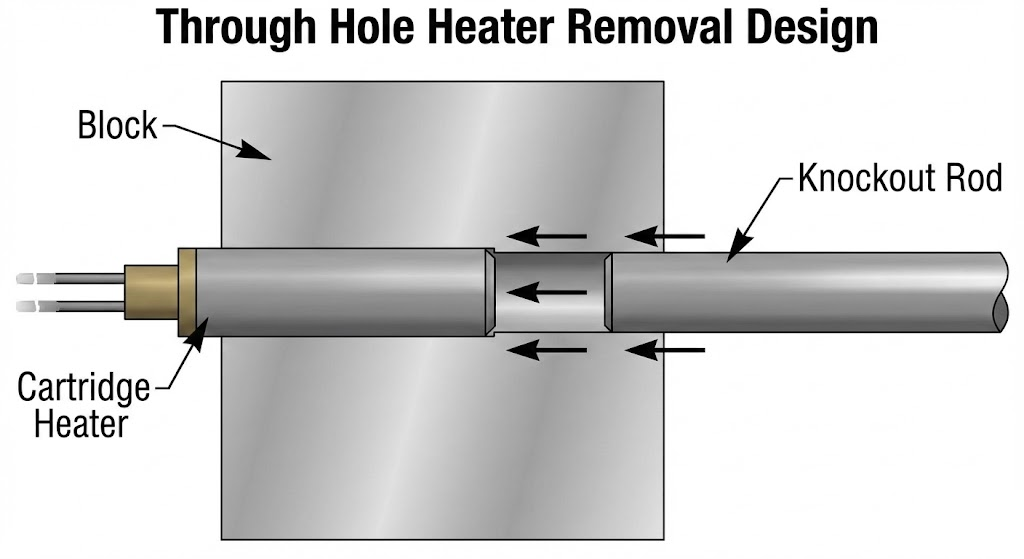
Method A: The Knock-Out (The Designer’s Method)
Prevention: This is why smart engineers design Through Holes, not Blind Holes.
- Access the back of the mold.
- Insert a steel rod (drift punch) slightly smaller than the hole.
- Tap gently with a hammer. The vibration breaks the oxidation bond better than pulling.
Method B: The Twist & Pull (The Technician’s Trick)
If it’s a blind hole and the leads have snapped off:
- Drill into the center of the heater (where the MgO is soft) about 1 inch deep.
- Take a Tapping Tool (Thread Tap) and screw it into the hole you just made. The tap will bite into the metal sheath or the hard MgO.
- Attach a slide hammer or a bolt to the tap and pull. This gives you a solid mechanical grip on the internal structure.
Method C: The Drill-Out (The Last Resort)
This is dangerous. One slip and the mold is scrap.
- Use a masonry drill bit or a carbide end mill slightly smaller than the heater diameter.
- Drill out the core (MgO and wire).
- You will be left with a thin “shell” of the heater sheath fused to the wall.
- Use a sharp pick or a reamer to carefully peel this shell inward, away from the mold wall.
4. Lead Protection & Environmental Control
The heater might be fine, but if the wires fail, the system fails.
Stress Relief (The “S” Loop)
Cartridge heater leads are often fiberglass-insulated, which can be brittle.
- Don’t: Bend the wires sharply at 90° right at the exit. This breaks the copper strands.
- Do: Create a small “S” loop or a gentle radius before securing the wire to the machine frame. This absorbs vibration and thermal expansion movement.
Moisture Sealing
If the environment is humid or oily:
- Apply a dab of RTV Silicone at the lead exit (if temperature permits).
- Or, specify Teflon (PTFE) Leads which seal inherently better than woven fiberglass.
5. The 1-Minute Pre-Flight Checklist
Before you flip the switch, verify these four points.
- [ ] The Fit: Does the heater slide in snugly? (It should not rattle, but you shouldn’t need a sledgehammer).
- [ ] The Ohm Check: Measure resistance. Does it match the rating? (Ohms = Volts² / Watts).
- [ ] The Ground Check: Measure continuity between the heater sheath and the mold. It should be continuous (for safety), but Measure resistance between Pins and Sheath (Should be $\infty$).
- [ ] The Voltage: Are you plugging a 120V heater into a 240V line? (This happens more than you think).
6. Maintenance Strategy: Rotate, Don’t Wait
In critical 24/7 production lines (like medical injection molding), waiting for failure is too costly.
- The Strategy: Implement a Scheduled Replacement Cycle.
- The Logic: If a heater costs $20 and a downtime hour costs $500, replace the heater every 6 months during scheduled maintenance. Don’t squeeze the last 1% of life out of it.
FAQ: Common Installation Questions
Is Thermal Grease the same as Anti-Seize?
No. Standard thermal grease (like for PC CPUs) dries out and turns into a powder at 200°C, losing its properties. You must use High-Temp Anti-Seize Compound (Copper or Nickel based), which contains metallic particles that prevent galloping even after the carrier grease burns off.
Why is my heater stuck even though I used paste?
Paradoxically, a loose fit often causes worse seizing than a tight fit.
The Physics: A loose fit allows air to enter. At high heat, the metal sheath oxidizes. This oxide scale expands, filling the gap and locking the heater in place like concrete. A tighter fit (H7) leaves no room for oxygen, reducing oxidation.
Can I cut the leads shorter?
Yes, you can cut the leads to length. However, ensure you use high-temperature ceramic wire nuts or high-temp crimps to make the connection. Do not use standard plastic electrical tape or low-temp solder close to the heater body.