Introduction
Why does a 40W heater work perfectly on a 220V industrial line but fail miserably when connected to a 12V battery? Why do the wires on my 3D printer’s hotend keep melting, even though the temperature reads normal?
In the world of thermal engineering, there is a dangerous misconception: “Low Voltage equals Safe.” While 12V won’t electrocute you, it brings a different, often more destructive enemy: Amperage.
Lowering the voltage requires a massive increase in current to deliver the same power. This shift changes everything—from the gauge of your wiring to the physics of your connectors. If you ignore Ohm’s Law here, you aren’t just risking a failed print or a cold medical probe; you are risking a fire.
This guide is designed for the 3D printer manufacturer, the portable device engineer, and the maker who needs reliability, not just heat. We will move beyond the basics and dive into the specific engineering standards for E3D/RepRap replacements, the Voltage Drop calculations that kill battery efficiency, and the critical Resistance Lookup Tables you need to troubleshoot your system.
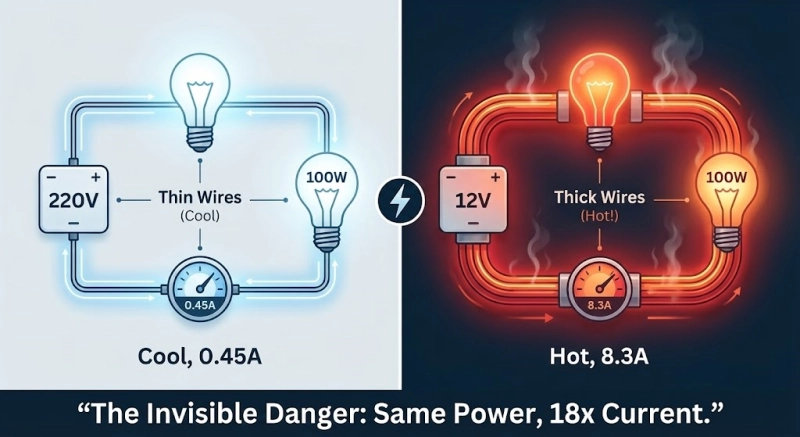
[Visual Element]: An infographic split in half. The left side shows a 220V 100W circuit with thin wires (Cool, 0.45A). The right side shows a 12V 100W circuit with thick wires glowing red (Hot, 8.3A). Caption: “The Invisible Danger: Same Power, 18x Current.”
1. The Core Challenge: Ohm’s Law and High-Current Physics
To master low-voltage heating, you must respect the math. The physics of a 12V system are fundamentally less forgiving than mains voltage.
The “Current Surge” Reality
Let’s look at the numbers. Power (P) is the product of Voltage (V) and Current (I). To keep Power constant while dropping Voltage, Current must skyrocket.
I = P / V
- Industrial Standard: A 100W heater at 220V draws just 0.45 Amps. You could run this on a hair-thin wire.
- Low Voltage: That same 100W heater at 12V draws 8.33 Amps.
The Engineering Implication: The heater itself isn’t the problem; the path to the heater is. At 8+ Amps, your wiring harness, PCB traces, and connectors become active components in the circuit. If they aren’t rated for this load, they become “heaters” themselves.
The Fatal Flaw of Contact Resistance
In high-voltage systems, a slightly loose screw terminal is a nuisance. In 12V systems, it’s a fire hazard.
Imagine a loose crimp connector creating just 0.1 Ω of resistance. It seems negligible, right?
Apply the formula for power loss (P = I^2*R) at 8 Amps:
P(loss)= 8^2 *0.1 = 6.4 Watts
You are now generating 6.4 Watts of heat inside your plastic connector. This is enough to melt the housing, fuse the contacts, and short the circuit.
Power Supply Headroom
A common failure in 12V systems is “Voltage Sag.” Cheap Switching Power Supplies (PSUs) often drop voltage under load. If your 12V rail drops to 11V when the heater turns on, your 40W heater is now only producing 33W (P = V^2/R).
Design Rule: Always spec your PSU with at least 20-30% headroom. If your heater needs 5A, your PSU should be rated for at least 6.5A.
2. 3D Printer Specialists: E3D & RepRap Standards
For the additive manufacturing industry, the cartridge heater is the heartbeat of the hotend. But not all “6x20mm” heaters are created equal.
Dimensions and Tolerance: The “Heat Creep” Killer
The industry standard size is φ6mm*20mm. However, “6mm” is a nominal dimension.
- The Trap: Many generic heaters are manufactured to -0.1mm tolerance.
- The Consequence: If the heater is 5.9mm and the aluminum block hole is 6.0mm, that 0.1mm air gap acts as an insulator. The heater core overheats, but the nozzle stays cool.
- The Spec: We manufacture to a strict -0.02mm to -0.04mm tolerance. This ensures a tight fit, efficient thermal transfer, and prevents “Heat Creep” (where filament melts too high up in the throat).
Ceramic vs. Swaged Metal: Which is better?
You will often see “Ceramic Cartridge Heaters” sold for 3D printers.
- Ceramic: Fast ramp-up, but extremely brittle. The high-frequency vibrations of a fast 3D printer (CoreXY or Delta) can crack the internal ceramic core, leading to sudden failure.
- Swaged Metal (Incoloy/SS): The professional standard. High-density MgO powder is vibration-compacted (swaged). It is rugged, durable, and can withstand the G-forces of modern high-speed printing.
Troubleshooting: The Resistance Lookup Table
Heaters rarely have legible labels after use. The only way to identify them is by measuring resistance. Use this table to check your parts bin:
| Voltage | Wattage | Target Resistance (Ω) |
| 12V | 30W | 4.8 Ω |
| 12V | 40W | 3.6 Ω (Standard E3D) |
| 12V | 50W | 2.9 Ω |
| 24V | 30W | 19.2 Ω |
| 24V | 40W | 14.4 Ω (Standard E3D) |
| 24V | 50W | 11.5 Ω |
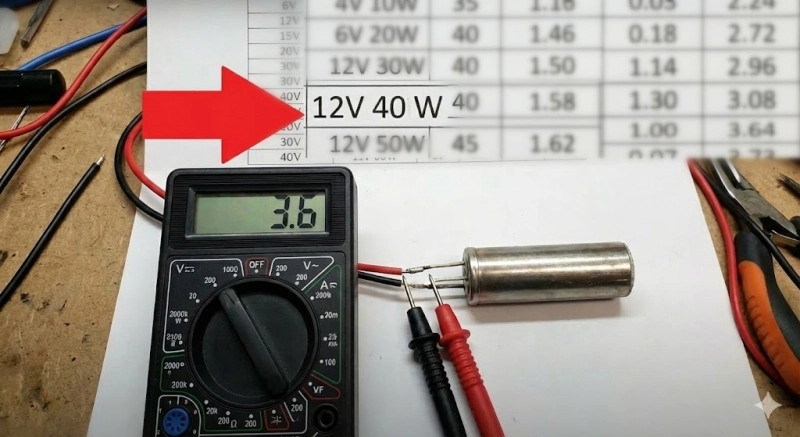
[Visual Element]: A photo of a multimeter probe touching the leads of a heater cartridge, with the screen reading “3.6”. An overlay arrow points to the table row “12V 40W”.
3. Battery & Portable Devices: Efficiency is Everything
When you are tethered to a Li-Ion battery pack, you don’t have the luxury of infinite power. Design strategies must shift from “Raw Power” to “Thermal Efficiency.”
Designing Against Heat Loss
In a mains-powered machine, if you lose 10W to the air, you just pull more power. In a battery device, that 10W loss kills your runtime.
- Solution: Insulate the heating block with Ceramic Fiber Tape or a Silicone Sock. This simple step can reduce energy consumption by 40% once the target temperature is reached.
The “Fast Ramp-Up” Strategy
Users hate waiting. To heat up fast without draining the battery, use Concentrated Watt Density.
Instead of a long 30mm heater spreading heat over a large area, use a shorter 15mm heater with the same wattage. This concentrates the energy exactly where it’s needed (the tip), reducing the thermal mass that needs to be saturated.
BMS Safety and Insulation Resistance
Even at 12V, Insulation Resistance (Cold) must be ≥500 MΩ.
Why? Because low insulation resistance means moisture ingress. This creates a tiny “leakage current.” Over days or weeks, this parasitic drain can unbalance your battery cells or trigger the safety lockout on your Battery Management System (BMS).
4. Wiring Guide: The Lifeline of Low Voltage
The wire is not just an accessory; it is a bottleneck.
Silicone vs. Teflon (PTFE) Leads
- Silicone: Flexible and soft. Good for external routing, but the insulation is thick and bulky.
- Teflon (PTFE): The Engineer’s Choice. It has high dielectric strength, allowing for a very thin insulation layer. This means you can fit a thicker copper conductor (for better current capacity) into the same overall wire diameter. Plus, it withstands 200°C without melting.
The “Voltage Drop” Trap
This is the most common reason for “underpowered” heaters. Copper wire has resistance.
Example: A 2-meter run of 24 AWG wire has a resistance of roughly 0.5 Ω.
If you push 4 Amps through it, you lose 2 Volts in the wire (V=IR).
- Result: Your 12V heater only gets 10V.
- Power Loss: Power drops from 48W to 33W. You lost 30% of your power just in the wire!
Wiring Gauge Rule of Thumb (for < 1m length):
- Up to 3A: 22 AWG (0.34mm^2)
- 3A – 7A: 18 AWG (0.75mm^2)
- 7A – 12A: 16 AWG (1.3mm^2)
- > 12A: 14 AWG (2.0mm^2)
Connector Hygiene
Never use standard 2.54mm “DuPont” connectors (like those on Arduino/Servo cables) for heaters. They are rated for 1 Amp. Using them for a 40W heater is guaranteed to cause a meltdown.
Recommended: XT60 (Drone style), Molex Micro-Fit 3.0, or crimped ferrules into screw terminals.
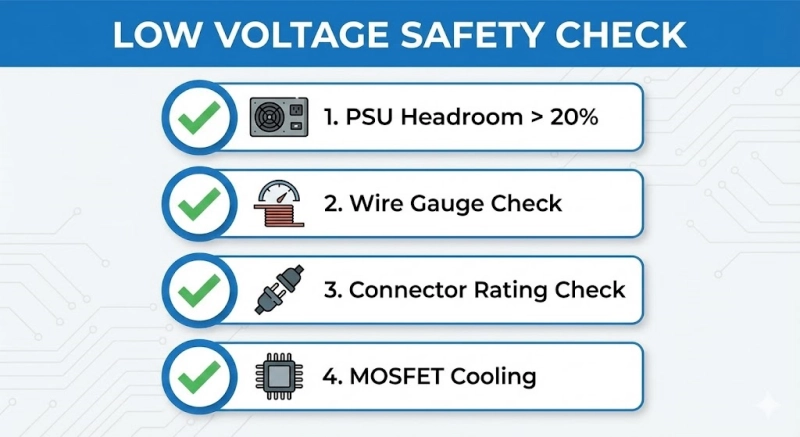
[Visual Element]: A checklist graphic titled “Low Voltage Safety Check”. Items: 1. PSU Headroom > 20%. 2. Wire Gauge Check. 3. Connector Rating Check. 4. MOSFET Cooling.
5. Troubleshooting Common Faults
Fault 1: Heater is extremely slow to reach temp.
- Diagnosis: Check the voltage at the heater terminals while it is on. If it’s significantly lower than at the PSU, your wires are too thin (Voltage Drop). Or, you are using a 24V heater on a 12V supply.
Fault 2: Connector is hot or blackened.
- Diagnosis: High contact resistance. Cut the connector off and re-crimp with a high-current rating terminal.
Fault 3: “Thermal Runaway” Error.
- Diagnosis: This safety feature triggers when the firmware applies power but sees no temp rise.
- Check for a broken wire (Open Circuit).
- Check if the thermistor has fallen out of the block.
- Verify the heater hasn’t slipped out of the hole.
FAQ: Common Low-Voltage Questions
Can I use a 12V heater on a 24V power supply to heat up faster?
ABSOLUTELY NOT. Doubling voltage quadruples wattage (P = V^2/R). A 40W heater will try to dissipate 160 Watts. The internal wire will melt instantly, and the intense heat can melt your aluminum block or start a fire.
Can I use a 24V heater on a 12V power supply?
Yes, but it will be underpowered. A 40W heater will only output 10 Watts. It will likely never reach printing temperature.
My 3D printer heater cartridge is stuck. How do I remove it?
This is caused by thermal expansion and oxidation. Heat the block up to 150°C (if the heater still works) or use a heat gun. Then, push the heater out from the back using a small hex key. Do not pull by the wires.
Does polarity (+ / -) matter for cartridge heaters?
No. Cartridge heaters are resistive loads. You can connect positive and negative to either wire without issue.