When a newly installed industrial band heater burns out after just two weeks of operation, the immediate reaction on the shop floor is predictable: “This batch is defective.” However, forensic engineering data tells a different story. According to field inspections conducted across hundreds of injection molding and extrusion facilities, up to 70% of premature band heater failures are not caused by manufacturing defects. They are the direct mathematical result of improper mechanical installation.
This guide provides an industrial-grade Standard Operating Procedure (SOP) for heating element installation. We will transition from the theoretical physics of thermal expansion to highly actionable, step-by-step guidance designed for the shop floor. By understanding how to eliminate destructive “hot spots” through precise locking procedures, maintenance teams can systematically double the lifespan of their thermal equipment.
Before proceeding with this installation protocol, it is critical to ensure you have specified the correct material matrix for your machine’s operating temperature and environmental conditions. If you are unsure whether your current application requires high-temperature steatite or rapid-response mica, refer to our comprehensive [Ceramic vs. Mica Selection Guide] prior to installation.
Failure Analysis from a Physics Perspective: The Deadly Impact of Air Gaps
To fundamentally change workshop installation habits, technicians must understand why brute force and approximations destroy heating equipment. The answer lies in the thermal conductivity of the materials involved.
Air: The Ultimate Thermal Conduction Blocker
Industrial band heaters operate on the principle of thermal conduction (and secondary radiation in the case of ceramic). For conduction to occur efficiently, the heat source and the heat sink (the barrel) must be in absolute physical contact.
Consider the thermal conductivity ($k$) of the materials:
- Carbon Steel (Machine Barrel): ≈ 45 W/m·K
- Ambient Air: ≈ 0.026 W/m·K
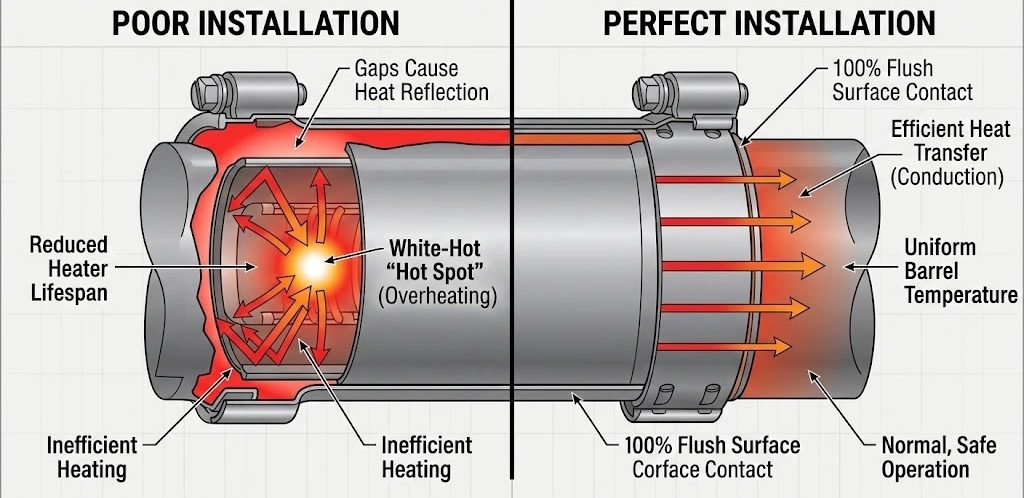
Air is an exceptional thermal insulator. If a band heater is installed loosely, leaving even a microscopic 0.1mm gap between the metal sheath and the barrel, that gap acts as a thermal blockade.
A band heater generates heat continuously based on its wattage; it cannot “throttle” its own power output unless commanded by the PID controller. If the heat cannot conduct into the barrel due to an air gap, the thermal energy backs up into the heater core. The internal Nickel-Chromium (NiCr) resistance wire experiences an immediate temperature surge, rapidly exceeding 800°C. Within hours or days, the wire oxidizes, becomes brittle, and snaps.
Autopsy Findings: Diagnosing “Hot Spots”
When a maintenance technician removes a failed heating ring, the component itself provides a permanent record of the installation quality.
- Irrefutable Evidence of Air Gaps: If the interior face of the heater exhibits distinct black, carbonized scorch marks, or if the exterior stainless steel sheath shows localized blue, purple, or rainbow-colored annealing discoloration, the heater was not defective. These are classic “hot spots.” They physically prove that the heater was functioning perfectly, but the thermal energy was trapped in one specific location due to a lack of surface adhesion.
Pre-Installation Preparation
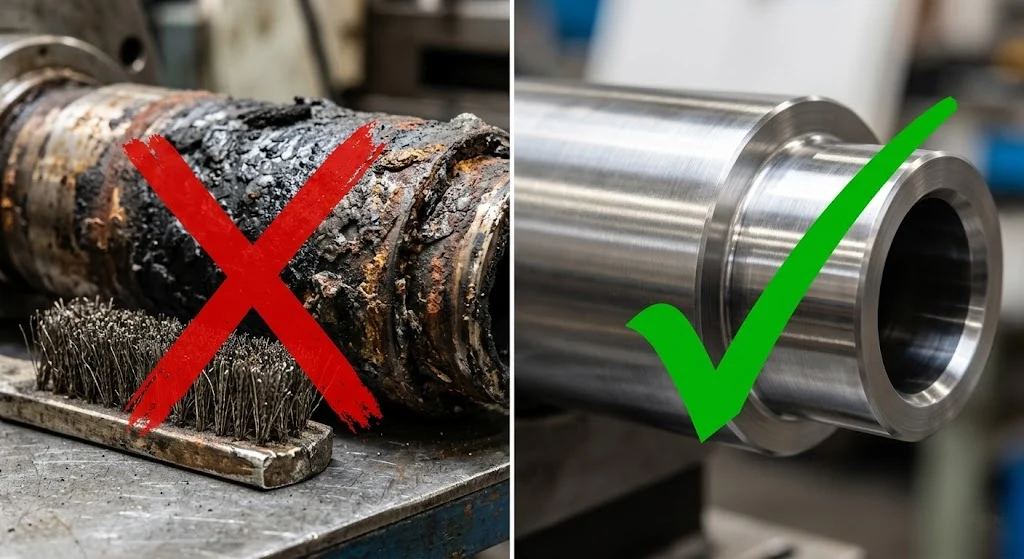
The most common error in field maintenance is speed. Rushing to put a new heater over a contaminated barrel guarantees an air gap.
Thorough Surface Cleaning
Over months of operation, injection molding barrels accumulate degraded polymer melt, ambient factory dust, and localized oxidation (rust).
- Lockout/Tagout: Ensure the machine is completely de-energized and at a safe temperature.
- Mechanical Scraping: Use a brass wire brush, a specialized brass scraper, or emery cloth to vigorously remove all carbonized plastic and rust from the target zone.
- Visual Inspection: The barrel surface must be completely flush and bare metal. Even a 1mm protrusion of hardened polycarbonate will act as a fulcrum, lifting the entire heating ring away from the barrel and destroying it.
The “No Thermal Paste” Rule
A persistent and highly destructive myth in thermal maintenance is that industrial band heaters require thermal paste (anti-seize or conductive grease), similar to a computer CPU.
Never apply thermal paste to an industrial band heater. Standard thermal compounds are engineered for low-temperature electronics (below 100°C). When subjected to the 300°C+ environment of a plastic extruder, the liquid carriers in the paste rapidly boil off and outgas. The remaining solid materials carbonize and bake into a rock-hard, crystalline crust. This crust completely loses its thermal conductivity and transforms into an insulating barrier. Using thermal paste is the fastest way to “overcomplicate” an installation and guarantee a premature burnout.
Standard Installation SOP: Achieving 100% Surface Adhesion
Once the barrel is prepped, the physical installation must be executed methodically to ensure perfect concentricity.
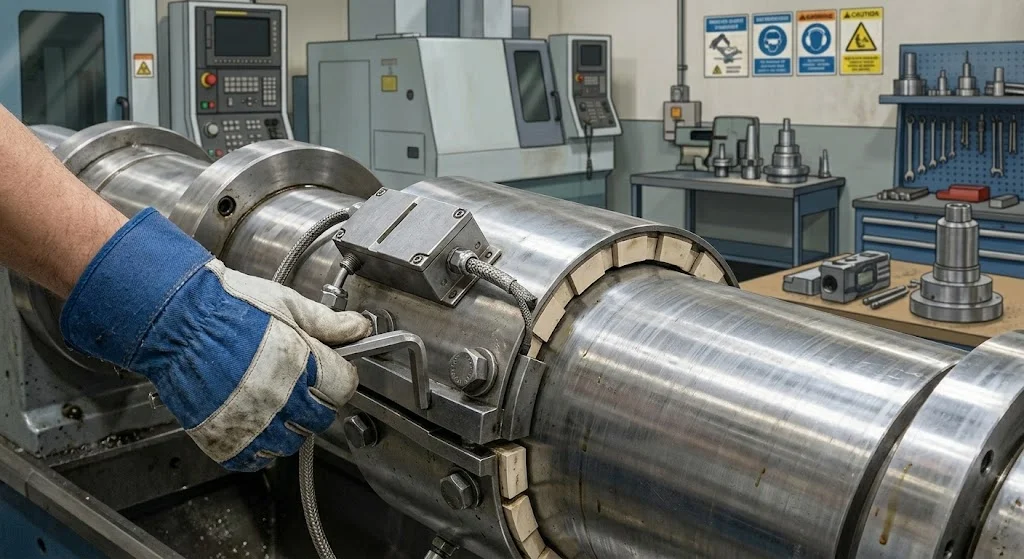
Step 1: Positioning and Initial Adhesion
Carefully slide or wrap the heating element around the barrel.
- Orientation: Rotate the heater so that the electrical terminals or lead wires are positioned away from potential polymer leakage zones (e.g., away from the nozzle tip or downward-facing vents).
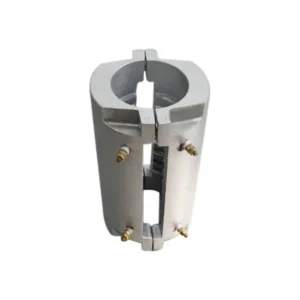
- Initial Clamping: Engage the clamping hardware (barrel nuts or flange bolts). Using a wrench or hex key, manually tighten the fasteners just enough so the heater grips the barrel but can still be slightly adjusted.
Step 2: The “Tap and Tighten” Method
Do not simply torque one bolt down to maximum tension and walk away. This will warp the heater housing, creating a tight pinch-point at the clamp and a massive air gap on the opposite side of the barrel.
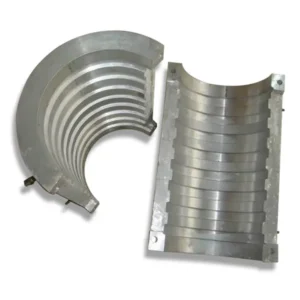
- Rubber Mallet Only: Use a soft-faced rubber or dead-blow mallet. Never use a steel hammer. Striking the heater with a metal hammer will permanently crush the internal phlogopite mica or shatter the interlocking steatite ceramic knuckles, causing an immediate internal short circuit.
- Alternating Tension: Gently tap the outer circumference of the heating ring with the mallet to force the heater to seat flush against the barrel.
- Torque: While tapping, systematically alternate tightening the screws on the clamping mechanism (similar to tightening lug nuts on a car tire). This ensures perfectly even stress distribution and maximizes surface contact.
Critical Action: Re-Torquing Under Heat
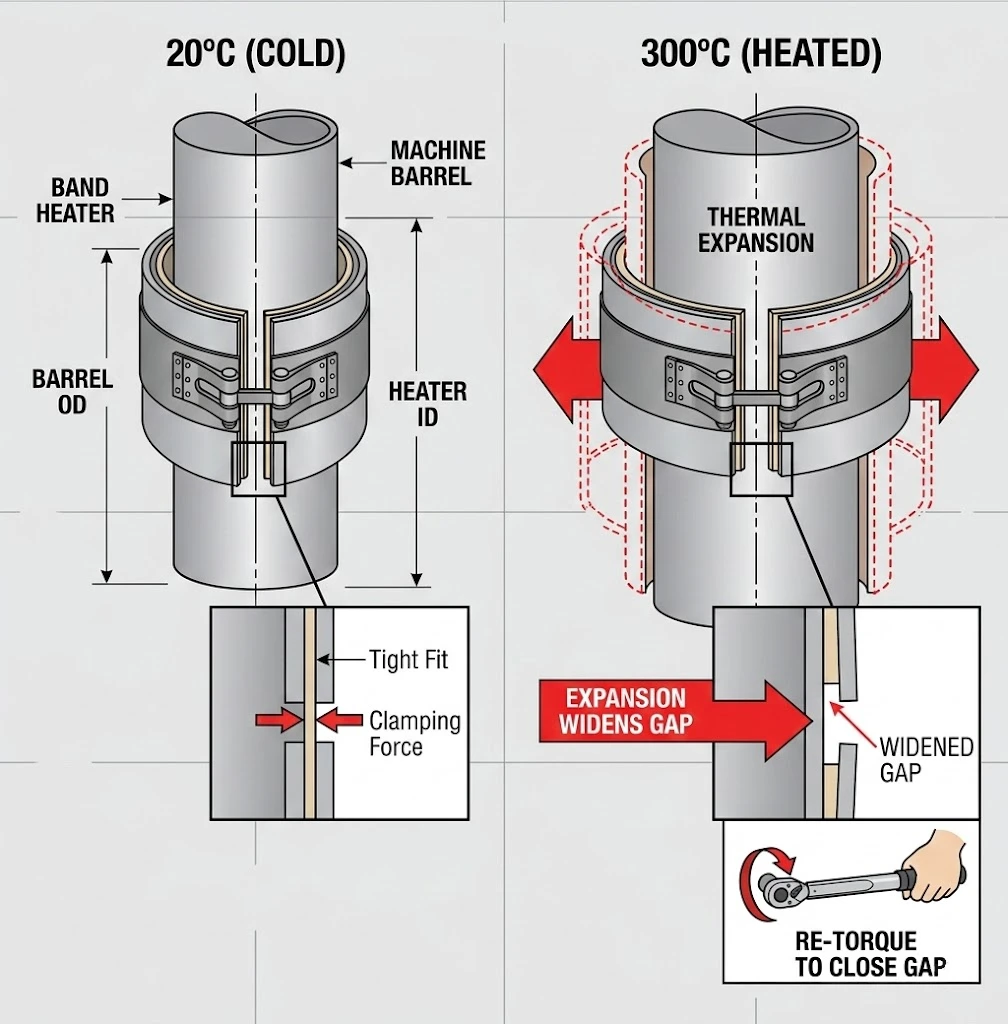
If a maintenance supervisor asks, “Why did this heater burn out after five days when I know my technician tightened it perfectly during installation?” the answer is almost always thermal expansion.
The Challenge of Thermal Expansion
Metals expand when heated based on their Coefficient of Thermal Expansion ($\alpha$). When the machine transitions from a cold state (20°C) to its operating setpoint (e.g., 280°C), both the steel machine barrel and the stainless steel sheath of the heater expand.
Because the heater is a split ring, this physical expansion causes the outer circumference to grow, inherently loosening the clamping mechanism. A heater that was torqued to spec when cold will be dangerously loose when hot.
Optimal Intervention Timing (The Secondary Tightening)
Performing a “hot re-torque” is the single most critical step in this SOP. It extends the functional lifespan of the heating element by over 50%.
- Initial Heat Up: Energize the heating zone and allow the PID controller to bring the barrel up to its standard operating temperature.
- Immediate Action: The moment the machine reaches the set temperature, power down the zone to ensure electrical safety.
- Re-Torque: While wearing appropriate high-temperature PPE (Personal Protective Equipment), immediately retighten all clamping screws to eliminate the slack created by thermal expansion.
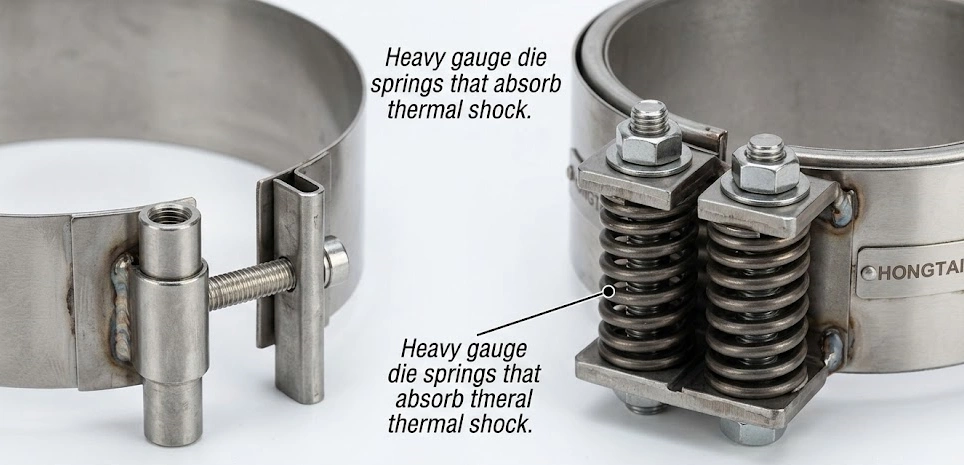
Hardware Upgrades for Large-Diameter Barrels
The physics of thermal expansion become exponentially more difficult to manage as the diameter of the barrel increases.
Why Standard Clamping Fails on Large Extruders
For injection molding barrels or pipe extruders exceeding 300mm in diameter, the total linear expansion of the metal is massive. A standard rigid screw-and-barrel-nut clamp cannot stretch. It will either snap under the tensile load during heat-up, or it will stretch permanently, leaving the heater completely loose when the machine cycles back down to room temperature.
Spring-Loaded Clamps (The Engineered Solution)
To counteract this physical limitation, large diameter heaters must be specified with spring-loaded clamping mechanisms.
| Clamping Type | Mechanism of Action | Best Application |
|---|---|---|
| Standard Barrel Nut | Static tension via threaded screw. Requires manual hot re-torquing. | Small to medium nozzles and barrels (< 250mm). |
| Spring-Loaded Clamp | Heavy-duty die springs actively compress and expand to absorb thermal displacement. | Large extruders (> 300mm) and high-vibration environments. |
Hongtai’s spring-loaded design utilizes high-tension die springs integrated into the locking bolts. These springs dynamically absorb the dimensional changes caused by thermal expansion, ensuring the heating elements remain firmly secured to the barrel at all times, completely automating the tensioning process and preventing air gaps without requiring constant manual intervention.
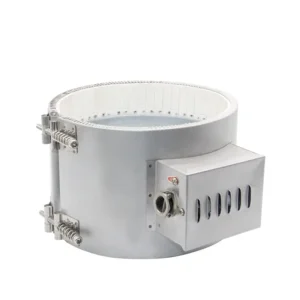
Electrical Connection Safety Specifications
Improper mechanical clamping destroys the heater core; improper electrical termination destroys the connection leads, creating severe arcing and short-circuit hazards.
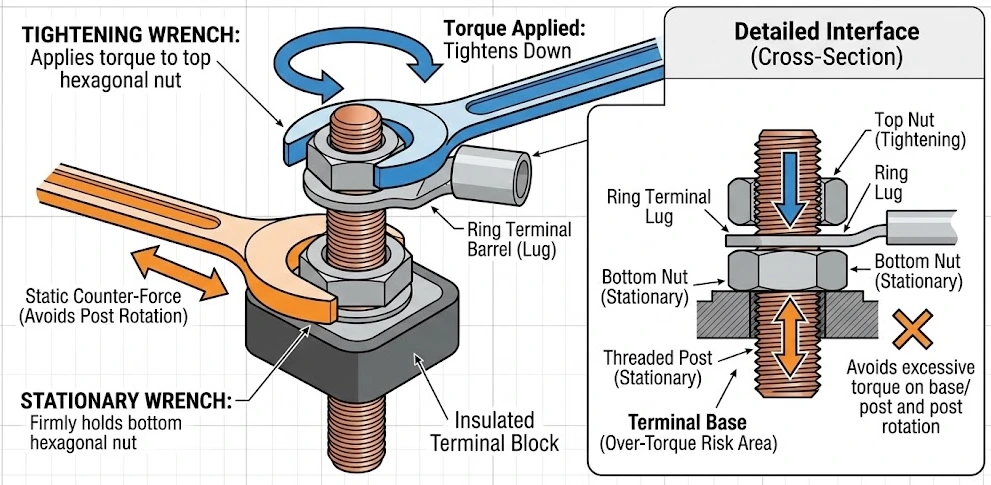
Avoiding Terminal Stress (The Two-Wrench Method)
When a band heater is equipped with threaded post terminals, field technicians frequently make a critical error: they use a single wrench to aggressively tighten the top nut over the wire terminal.
This single-wrench action applies immense rotational torque to the central post. This post is directly welded to the fragile NiCr resistance wire inside the heater. Twisting the post snaps the internal wire instantly.
- The SOP: Always use the “Two-Wrench Method.” Use a thin wrench to hold the bottom nut (closest to the heater sheath) completely stationary. Use the second wrench to tighten the top fastening nut. This isolates the torque and protects the internal cold pin connection.
Insulation and Dust Protection Measures
The machine environment is hostile. Splashing molten polymer, dripping hydraulic oil, and conductive carbon dust can easily bridge the gap between exposed electrical terminals.
- Protection: Ensure all wiring complies with AS/NZS and CE electrical safety standards. Utilize high-temperature ceramic terminal caps to shield exposed posts. In areas highly prone to contamination, specify band heaters with fully enclosed, welded terminal boxes or specify stainless-steel braided armor over the lead wires to prevent mechanical abrasion.
Post-Installation Self-Test Checklist
Do not energize the machine for production until the installation technician has verified the following parameters:
[ ] Surface Preparation: Barrel thoroughly scrubbed of all carbonized plastic, oil, and rust?
[ ] No Compounds: Verified that absolutely zero thermal paste or anti-seize was applied to the barrel or heater?
[ ] Mechanical Seating: Rubber mallet utilized to ensure flush contact, with clamping screws evenly tightened on alternating sides?
[ ] Thermal Expansion Compensation: Secondary “hot re-torquing” completed immediately after the machine reached operating temperature?
[ ] Electrical Integrity: “Two-Wrench Method” utilized to secure terminals, preventing internal wire fracture?
Frequently Asked Questions
Why shouldn’t I use thermal paste when installing a band heater?
Industrial band heaters operate at extremely high temperatures (often over 300°C). Standard thermal paste or anti-seize compounds will chemically break down, carbonize, bake on, and harden at these temperatures. Once carbonized, the paste acts as a highly effective thermal insulator, preventing heat transfer into the barrel and causing the heater to quickly overheat and burn out.
Do I really need to re-tighten the heater after the machine heats up?
Absolutely. As the band heater and your machine barrel heat up, the metal materials undergo thermal expansion. This physical expansion causes the initially tight clamping mechanism to loosen, creating microscopic air gaps. Re-torquing the screws when the heater is hot ensures a tight fit, maintains thermal conductivity, and prevents destructive hot spots.
Can I use a regular steel hammer to tap the band heater into place?
No, never use a steel hammer. Striking the metal sheath with hard metal can permanently damage the internal interlocking ceramic tiles, crush the phlogopite mica insulation, or sever the delicate resistance wire inside. Always use a soft rubber or dead-blow mallet to gently seat the heater.
My large extruder heater keeps loosening no matter how tight I make it, what should I do?
For large diameter barrels (typically over 300mm), standard rigid clamping screws are physically insufficient to handle the significant dimensional changes of thermal expansion. You must upgrade to band heaters equipped with “spring-loaded barrel nuts.” These heavy-duty die springs actively compress and expand, automatically compensating for thermal expansion and maintaining constant, flush tension at all temperatures.