Introduction
A heater without a controller is like a sports car without brakes. It might go fast, but it will eventually crash.
In thermal engineering, applying power is the easy part. The challenge lies in Control. Whether you are building a 3D printer heated bed, a medical incubator, or an industrial oil warming belt, the difference between a successful product and a fire hazard is the feedback loop.
Many engineers struggle with the “Integration Dilemma”: Should you use a simple bimetal switch? Do you need a digital PID controller like the Keenovo style? Or is a built-in NTC 100K thermistor sufficient for your PLC?
This guide is your white paper on Temperature Control Integration. We will dismantle the “Black Box” of thermal sensors, compare open-loop vs. closed-loop strategies, and help you select the precise control architecture for your application.
Need a complete plug-and-play system? Explore our [Digital Control Solutions].
1. Why is Control Mandatory? (The Risk of Thermal Runaway)
Silicone rubber is a robust material, rated for continuous use at 250°C. However, physics is unforgiving.
The “Unloaded” Danger
If a 500W heater is detached from its heat sink (the part it heats) while running at full power, the energy has nowhere to go. The internal temperature can spike to 400°C in seconds.
- Result: The silicone carbonizes, turns brittle, and the internal element burns out.
- The Fix: A control system prevents this by sensing the rise in temperature and cutting power before damage occurs.
Closed-Loop Control Explained
To achieve stability, you need a “Closed Loop”:
- Sensor: Reads the current temperature (Process Value – PV).
- Controller: Compares PV to your Target Temperature (Set Value – SV).
- Actuator: Turns the heater ON or OFF to minimize the difference.
2. The “Eyes”: Integrated Sensor Options
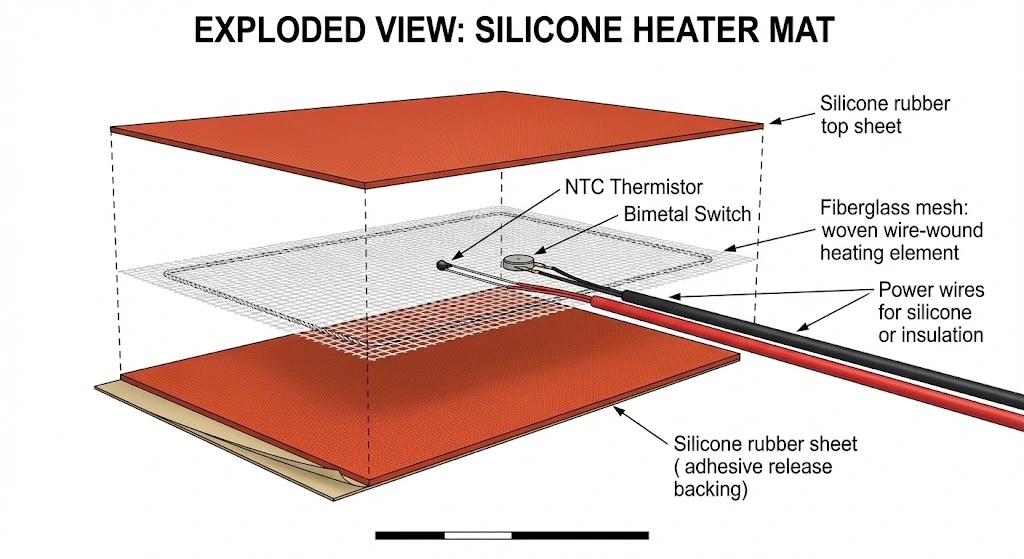
For OEMs integrating heaters into larger machines (like 3D printers or analytical instruments), we recommend embedding the sensor directly into the silicone mat during manufacturing.
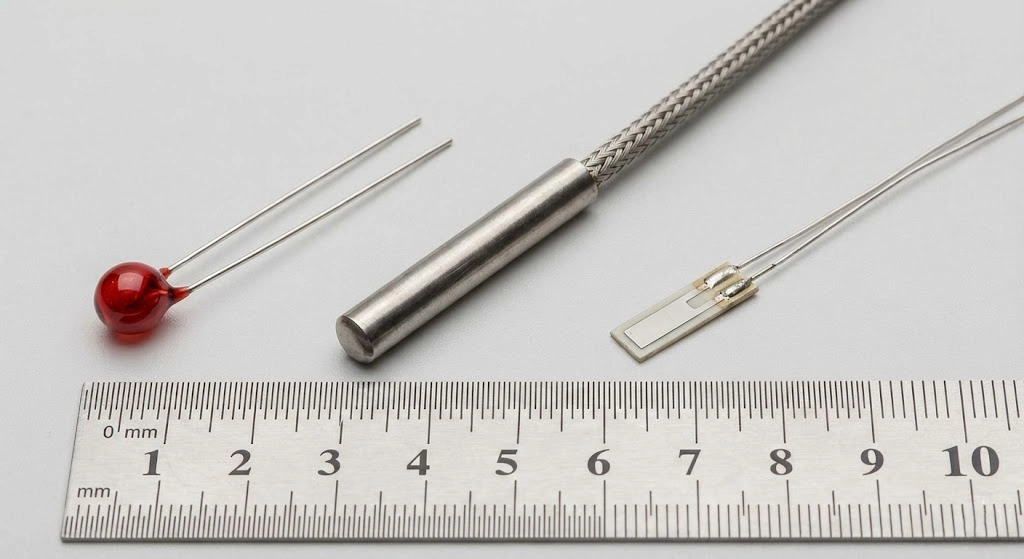
A. NTC Thermistor (100K 3950) – The 3D Printing Standard
- Profile: Tiny glass bead, low cost.
- Specs: 100K Ohms at 25°C, Beta Value 3950.
- Why Use It: It is the standard for 3D printer firmware (Marlin, Klipper) and low-cost consumer electronics.
- Compatibility: Perfectly replaces generic or Keenovo-style heated bed sensors.
B. Thermocouples (Type J / Type K) – The Industrial Workhorse
- Profile: Welded wire junction.
- Specs: Type J (0-750°C), Type K (0-1200°C).
- Why Use It: Extremely durable and resistant to vibration. Ideal for harsh industrial environments where electrical noise might interfere with other sensors.
C. RTD (PT100 / PT1000) – The Laboratory Precision
- Profile: Platinum Resistance Thermometer.
- Specs: DIN Class A or B accuracy.
- Why Use It: Linear accuracy. If your medical device requires ±0.5°C stability, you must use an RTD.
3. The “Brain”: Control Architectures
A. Built-in Bimetal Thermostat (The Safety Limiter)
This is a mechanical switch vulcanized onto the heater.
- Logic: Hard-wired. e.g., “Open at 150°C, Close at 130°C”.
- Accuracy: Low (±10°C).
- Best For: Overheat Protection. It acts as a resettable fuse. We recommend adding this in series with every heater as a fail-safe, even if you have a digital controller.
B. Analog Dial Controller (The Rugged Choice)
Common on our Oil Drum Heaters.
- Logic: A capillary bulb liquid-filled thermostat with a knob (0-120°C).
- Pros: No electronics to fail. Bomb-proof reliability for construction sites and outdoor tanks.
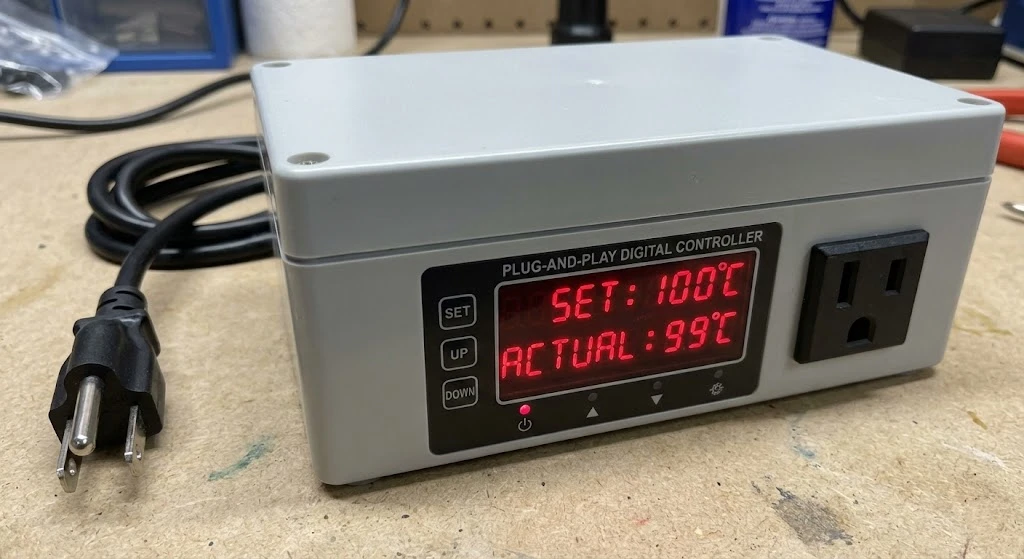
C. Digital PID Controller (The Precision Choice)
For users who want a “Keenovo-style” plug-and-play experience.
- Logic: PID (Proportional-Integral-Derivative) algorithm. It doesn’t just turn on/off; it pulses power to glide smoothly to the setpoint without overshooting.
- Features: LED display, IP65 waterproof case, and programmable hysteresis.
4. Sensor Placement: The “Location” Dilemma
Where we place the sensor inside the heater changes how the system behaves.
Option A: Internal (On the Element)
We place the sensor directly on top of the etched foil circuit, buried in the silicone.
- Pros: Fastest response. Protects the heater from burning out.
- Cons: The sensor reads the heater temp, not the part temp. There will be a temperature offset (e.g., Heater is 100°C, Part is 90°C).
Option B: External (On the Load)
You mount the sensor on your metal tank or plate.
- Pros: Accurate reading of the actual object.
- Cons: Thermal Lag. The heater might overheat before the heat travels to the sensor.
- Recommendation: Use Option A for safety, or Option A + Option B (Cascade Control) for critical precision.
Design Reference: Sensor Selection Matrix
| Sensor Type | Temp Range | Accuracy | Cost | Typical Application |
| NTC 100K | -50°C ~ 200°C | ±1-2% | $ | 3D Printers, Heated Beds |
| Type K T/C | -200°C ~ 1200°C | ±1.5°C | $$ | Industrial Machinery, Injection Molding |
| PT100 (RTD) | -200°C ~ 600°C | ±0.3°C | $$$ | Medical IVD, Lab Instruments |
| Bimetal Switch | Fixed Setpoint | ±5°C | $ | Safety Limit (Anti-Burnout) |
Frequently Asked Questions (FAQ)
Can I cut or extend the sensor wires?
For Thermocouples (Type K/J): NO. You cannot use standard copper wire to extend them; you must use specific “Thermocouple Extension Wire.” Cutting them is fine, but extending them incorrectly ruins accuracy.
For NTC/PT100: Yes, but adding long wire lengths adds resistance, which can slightly skew the temperature reading. You may need to calibrate your controller offset.
Can I control your heaters with an Arduino or Raspberry Pi?
Absolutely. This is a very common setup.
Order the heater with a built-in NTC 100K thermistor.
Connect the NTC to your microcontroller’s analog input (using a voltage divider).
Use the microcontroller to switch a Solid State Relay (SSR) or MOSFET, which powers the heater. This gives you full PWM control via software.
What is the difference between a Thermal Switch and a Thermal Fuse?
Thermal Switch (Thermostat): Resettable. It clicks off when hot and clicks back on when cool. Used for temperature control.
Thermal Fuse: One-time use. If it blows, the circuit is permanently broken and the heater must be replaced. Used for ultimate fire safety.
Stop overheating your equipment. Upgrade from “Guesswork” to “Precision.” Contact HT-Heater to integrate the perfect thermal control system today.